


command-line mode
INSTALLING ARCH LINUX
STEP 1
DOWNLOAD ISO
Download Arch Linux from Arch website
Use dd command to create a startup disk in any Linux. If from windows use other utilities like UNetbootin to create a startup disk.
To create start-up disk from Linux use dd command.
sudo dd if=/home/suresh/Downloads/archlinux-2021.10.01-x86_64.iso of=/dev/sdx
Note. sdx is your pendrive, usually sdb, sda, sdc, please check before you use this command.
STEP 2
BOOT INTO YOUR SYSTEM WITH PEN DRIVE
In BIOS - Boot from your USB Disk, If it fails see you BIOS Settings or check your USB Disk, Check your boot options in your BIOS Settings and make sure you select to boot from USB.
Note. Arch Linux installation images do not support Secure Boot.
STEP 3
IF BOOT SUCCEEDS CHECK YOUR INTERNET CONNECTION FROM ARCH INSTALLATION SHELL.
If boot succeeds, As shown below you will be landed into archiso installation shell with prebuilt tools. You will have all the tools needed with network and editors for assisting installation.
root@archiso ~ #
There you check for Ethernet Network Connection, I am assuming you have a working Ethernet connection
#ip link
#ping www.google.com
Wi-Fi—authenticate to the wireless network using iwctl
Step 4
SET NETWORK TIME SYNC
#timedatectl set-ntp true
Step 5
DISK PARTITON
Check your system booted with UEFI or BIOS
# ls /sys/firmware/efi/efivarsIf efivars directory exists then you are booted with EFI support, So you need to go for efi partition.
#fdisk -l
#fdisk /dev/the_disk_to_be_partitioned
Example partition
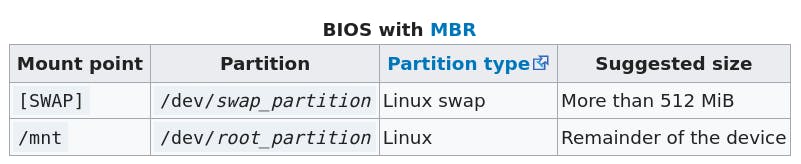

If you have lot of RAM you can eliminate swap partition, No need to create swap partition.
Note- EFI partition can be around 300MB
Step 6
AFTER CREATING PARTITIONS MAKE FILE SYSTEM
#mkfs.ext4 /dev/root_partition
#mkfs.fat /dev/efi_partition
#mkswap /dev/swap_partition
Note- EFI Partition should be formated to fat32
Step 7
MOUNT THE FILE SYSTEM
#mount /dev/root_partition /mnt
if in case you create swap use swap on
#swapon /dev/swap_partitionNote. genfstab will later generate fstab file
Step 8
INSTALL LINUX BASE and FIRMWAER
# pacstrap /mnt base linux linux-firmware
Step 9
GENERATE FSTAB FILE
#genfstab -U /mnt >> /mnt/etc/fstab
Step 10
CHANGE ROOT IN TO THE NEW SYSTEM
# arch-chroot /mnt
Note. after change root only you need to install grub boot loader. fallowed by few steps.
Step 11
GENERATE LANG
Edit /etc/locale.gen and uncomment en_US.UTF-8 UTF-8 and other needed locales. Generate the locales by running the below command
#locale-gen
Step 12
CREATE LOCAL CONFIG
Create the /etc/locale.conf file, and set the LANG variable accordingly
LANG=en_US.UTF-8
add the above entry to locale.conf
Step 13
SET HOSTNAME
#echo mylinux > /etc/hostname
Instead of above command you can open the file /etc/hostname and enter the name of your desired name
Create a file in /etc/hosts with ‘touch’ command.
#touch /etc/hosts
127.0.0.1 localhost
::1 localhost
127.0.0.1 yourhostname
Add the above entries to /etc/hosts file
Step
14 SET ROOT PASSWORD
#passwd
Step 15
CREATE EFI DIRECTORY, MOUNT IT, and INSTALL GRUB
#mount /dev/sda1 /boot/efi
#pacman -S grub efibootmgr
#grub-install –target=x86_64-efi –bootloader-id=GRUB --efi-direcotory=/boot/efi
Step 16
GRUB MAKE CONFIG
#grub-mkconfig -o /boot/grub/grub.cfg
Step 17
INSTALL GUI and DESKTOP
My choice of desktop is xfce4, you can install gnome, kde, plasma, lxdm of your choice even you can install multiple desktop environments.
#pacman -S xorg xorg-server
#pacman -S xfce4
#pacman -S xfce4 xfce4-goodies
Step 18
INSTALL DISPLAY MANAGE
You can install gdm,lighdm, or sddm to your choice. Here I have installed sddm, you can try gdm.
If you want gdm and gnome you can installation.
#pacman -S gnome
#systemctl enable gdm.service
If you want sddm
#pacman -S sddm
#systemctl enable sddm
Note. You need to enable only one Display Manager, You can install both the display managers but you should enable only one display manager.
Step 19
INSTALL NETWORK RESOURCES
Note . Very important because with out installing and enabling network manager next boot you can not access internet. So you should enable for network ready system.
#pacman -S netowrkmanager
#pacman -S network-manager-applet

#systemctl start NetworkManager
#systemctl status NetworkManager
#systemctl enable NetworkManager
#systemctl enable NetworkManager.service
Step 20
INSTALL AUDIO VIDEO SUPPORT
#pacman -S pulseaudio
#pacman -S pulseaudio-alsa
#pacman -S pulseaudio-bluetooth
#pacman -S pulseaudio-jack
#pacman -S pulseaudio-equalizer
#pacman -S vlc
Step 21
Update
#pacman -Syu
Step 22
EXIT FROM CHROOT AND SHUTDOWN
#exit
#shutdown now